How to use aliases in VSCode extension development
I had a nightmare that looked like this:

I was trying to manage all those paths but they kept running away, and imports like these were all over the project. I tried to refactor it and eventually woke up in a cold sweat. Thank God we have aliases. So my actual project code looks like this:

Unfortunately, the VSCode extension generator doesn’t add aliasing to the template app. But since it’s just a regular JS app, after all, we can use JS libs to make aliases available!
I’ll now describe how I added aliases to my project step by step, but if you don’t care about details, just go directly to the template repo.
So, I have a Typescript VSCode extension, that does whatever it does, but has long paths for imports. Also, like a cool kid, I package my extension with Webpack. Tests are not getting packed though, and they’re launched on unpacked compiled code. This is how my folder structure looks like:

I don’t like the fact that the test folder falls under src by default after you generate an extension, so I moved it to the extension root. Also, I had used an older version of the generator for my extension, so I have the webpack.config.js file in the root as well. That doesn’t really matter if you have a different structure, you still can use aliasing.
Alright, so we have 3 (let’s call them) “build mechanisms”:
- Typescript compilation
- Webpack packaging
- Test build
And each one of them needs to know what aliases I have in my project. The config files are (respectively ordered):
tsconfig.jsonwebpack.config.jspackage.json— well, that’s where you can put the initial alias configuration.
I’ll use the module-alias npm package to make aliases available for pure JS code (tests). Let’s install it:
npm i — save-dev module-alias @types/module-aliasBoth Webpack and Typescript support aliases out of the box. But when we talk about extensions TS only supports them for compilation. After that, you should also use module-alias.
Ok, first let’s make sure our compiler is aware:
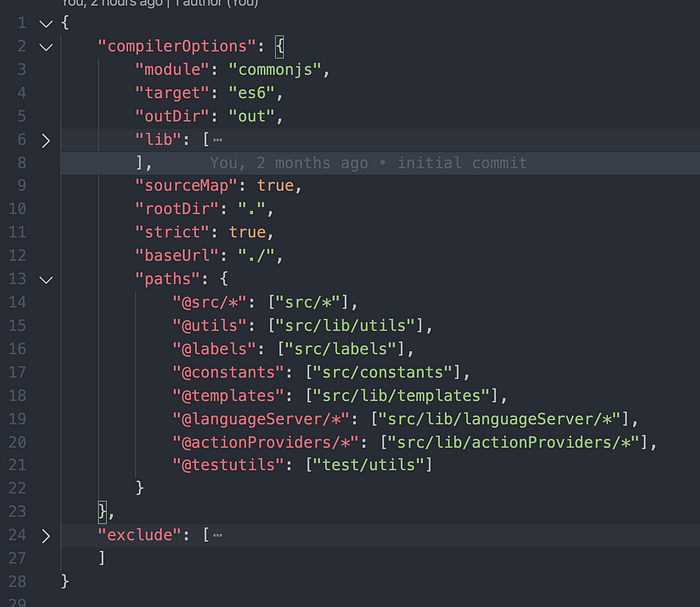
tsconfig.jsonThe property path is the one that handles aliases. You need to specify baseurl to make it work. I use the @src alias for test code to know where modules are. Sometimes it’s useful.
Now, let’s tell Webpack about those aliases as well, because Webpack also needs to resolve them when bundling the extension.

As you can see the format is slightly different. When we configure TS, folders have /* at the end, unlike Webpack aliases. E.g. @src alias is src/* in tsconfig.json and just src in webpack.config.js.
Ok, that the production build works. But the test (unbundled) build still doesn’t. Unfortunately, specifying aliases in thetsconfig.json file is not enough. That’s where module-alias comes to play. Let’s configure it in the package.json. As you can see, I’m using the out folder as a starting point for these aliases. This is because the out folder contains the compiled code.

After that, you need to register aliases in code by importing module-alias/register. You only need it in tests, so you can just import it into the test entry point runTest.ts.

Ok, cool that works. The problem is now you have 3 sources of aliases for the app. This is hard to manage, probably not as hard as long paths though. Still, I’d like to have everything in one place.
Fortunately, it is possible. The Webpack config is a .js file, which means we can write JS code to build aliases on-flight. Let’s use tsconfig.json as a source for aliases.
As I mentioned earlier, the Webpack config has a different alias syntax comparing to the TS config. That mean we need to translate this:
“@src/*”: “src/*”to this:
“@languageServer”: “src/lib/languageServer”It’s better to use full paths to make sure they resolve correctly. Here’s a sample code that does the conversion:
const tsconfigContent = require('./tsconfig.json');const alias = {}Object.entries(tsconfigContent.compilerOptions.paths).forEach(
  ([aliasName, [ aliasContent ]]) => {
    const name = aliasName.replace('/*', '');
    const aliasPath = path.resolve(
      root,
      'out',
      aliasContent.replace('/*', '')
    );
    alias[name] = aliasPath;
  }
)
So we basically iterate over aliases, convert them to the Webpack format and populate the alias variable. After that, we just need to add thealias variable to theresolve property of the config object.

Now let’s get rid of package.json aliases that we use for test compilation. The module-alias lib provides an API to create aliases programmatically. Let’s use the TS config as a source once again. Here’s the alias.ts module, that does the conversion:
import * as moduleAlias from 'module-alias';
import * as path from 'path';
const tsconfigContent = require('../../tsconfig.json');const paths = tsconfigContent.compilerOptions.paths;
const extensionRoot = path.resolve(__dirname, '..', '..');Object.entries(paths).forEach(
  ([aliasName, aliasContentList]: [string, unknown]) => {
    const [aliasContent] = aliasContentList as string[];
    const name = aliasName.replace('/*', '');
    const aliasPath = path.resolve(
      extensionRoot,
      'out',
      aliasContent.replace('/*', '')
    );
    moduleAlias.addAlias(name, aliasPath);
  }
);
The conversion is almost the same as for Webpack, so there’s some room for improvement here to reduce code duplication. The only difference is that we need to add the out folder:
“@src/*”: “src/*”to this:
“@src”: “out/src”The out folder contains the compiled JS. After that we need to import the conversion script before the alias registering:

This only needs to be done in the runTest.ts before the module-alias import.
So now you can use aliases instead of long full paths in your extension’s code and you only have one source of truth in tsconfig.json. No more long paths and nightmares, yay!
Here’s a link to the repo with my extensions template, that uses aliases.
